AirSim Georeferenced World - Part 1
This article is Part 1 in a two part series of creating a georeferenced world in the Unreal Engine that can be used in AirSim. Part 1 will focus almost entirely on creating the world in Blender, while Part 2 will focus on importing the world into Unreal and working with AirSim in the Unreal Engine.
What does Georeferencing Mean?
Georeferencing is usually defined as the process of transforming the internal coordinate system of a dataset to geographic coordinates (GPS). For a picture (raster) this could mean each pixel (our data coordinate) is assigned some (Longitude, Latitude) pair. In a similar manner we want to recreate a city in the Unreal Engine, which has its own coordinate system, and be able to relate it one-to-one with GPS coordinates. We will use Open Street Maps (OSM), which holds map information in a database of the world (buildings, parks, etc.), as the data source for this recreation process. Note that all data in OSM, such as the vertices of a polygons defining a building, are referenced using (Lon, Lat) coordinates.
The earth is spherical and we use a spherical coordinate system (Lon, Lat) to define positions, but very often we desire to visualize our data in cartesian coordinate systems (like a map). Because of this we often use a projection coordinate system to project the spherical earth on to a flat two-dimensional Cartesian coordinate plane. However every projection has distortion that may effect the area and the shape of real world objects it aims to represent. This post will not go into great detail between different map projections, however a great article can be found here if you want to learn more. The basic take-away is that geographers have defined many local map projections (sometimes the size of a country, state, or even smaller) that work best in that region.
Blender and the Unreal Engine are also defined in a cartesian coordinate system (x,y,z) and therefore a projection must be made. The next section will now go over the process of importing OSM data, in (Lon, Lat) coordinates, and projecting and creating a world into any arbitrary map projection into Blender.
Setup
First ensure that you have installed Blender, preferably 2.80+. All the screenshots shown are from blender 2.80 beta, which has a much different interface, so use that if you are not familiar with blender. Next up you need to purchase and download this amazing addon called blender-osm. This plugin is written in Python and has amazing features including:
- Automatically download OSM for the region of interest
- Recreate buildings and their roof shapes
- Import elevation from SRTM and create a terrain mesh
- Overlay Satellite or OSM images on terrain mesh
I am not the creator of this plugin, just a user who really appreciates its functionality. There are two versions of this plugin, basic and premium; we only need the basic. Note that all Blender Plugins are licensed as LGPL, which means that the source code of the plugin is distributed to you upon purchase and you will have the full ability to modify and publish with the same license.
When I first began using this plugin it only had the ability to project to the transverse mercator projection system (not good enough for my purposes). However I opened an issue and worked with the blender-osm author to determine the best way to add this. We determined to create another generic blender map projection plugin that allows you to specify any projection system you desire and integrate this plugin into blender-osm! This plugin is called bpyproj and should also be installed following the instructions in the repo’s README. After installation this plugin (bpyproj) will give blender-osm the map projections we desire.
Code modifications
There are some small changes that need to be made to the source code of blender-osm to make it compatible with UE4. All blender plugins reside in a special user folder. Please refer to this article that details where it is on your system. Mine is C:\Users\Jerem\AppData\Roaming\Blender Foundation\Blender\2.80\scripts\addons on Windows 10. Once inside go into the folder blender-osm and make the following changes. I have spoken to the blender-osm author and he is working on addressing these needs so that you won’t need to modify files. Until then, hack away!
- Add a default UV texture to every object (required)
- This basically unwraps your 3D objects so that lighting works on them in Unreal
- Add a GUI option so that OSM colors are ignored and default colors are used (optional)
- Without this you may have purple, yellow, and pink buildings. I prefer to have a uniform looking city.
All the code changes are shown in the following git patch file. It is unlikely that you can just apply this patch directly, you will have to go the displayed filenames and line numbers and manually modify. However these are very small changes.
$ git format-patch -k --stdout HEAD^
From 0ea0c89cae68a3b1694bcbe44443bab8af1aefef Mon Sep 17 00:00:00 2001
From: Jeremy <JeremyBYU@gmail.com>
Date: Fri, 10 May 2019 14:16:16 -0400
Subject: GUI option to ignore OSM colors; Add default UV channel; fix
 image.pack() 2.8 bug

---
 building/renderer.py | 2 +-
 gui/__init__.py      | 7 +++++++
 renderer/__init__.py | 3 ++-
 4 files changed, 14 insertions(+), 3 deletions(-)

diff --git a/building/renderer.py b/building/renderer.py
index f68575c..0690ef7 100644
--- a/building/renderer.py
+++ b/building/renderer.py
@@ -202,7 +202,7 @@ class BuildingRenderer(Renderer3d):
         """
         # material name is just the related color (either a hex or a CSS color)
         name = Manager.normalizeColor(element.tags.get(tags[partIndex]))
-
+        name = None if self.app.ignoreOSMBuildingColors else name
         if name is None:
             # <name> is invalid as a color name
             if self.outline is element:
diff --git a/gui/__init__.py b/gui/__init__.py
index 6bdae59..ae1073d 100644
--- a/gui/__init__.py
+++ b/gui/__init__.py
@@ -366,6 +366,7 @@ class PanelBlosmSettings(bpy.types.Panel):
         box.prop(addon, "singleObject")

         layout.box().prop(addon, "ignoreGeoreferencing")
+        layout.box().prop(addon, "ignoreOSMBuildingColors")

         if not mode3dRealistic and addon.terrainObject in context.scene.objects:
             box = layout.box()
@@ -578,6 +579,12 @@ class BlenderOsmProperties(bpy.types.PropertyGroup):
         description = "Average height of a level in meters to use for OSM tags building:levels and building:min_level",
         default = 3.
     )
+
+    ignoreOSMBuildingColors = bpy.props.BoolProperty(
+        name = "Ignore OSM Color Information",
+        description = "Ignore OSM Colors Information. Will use sane default colors",
+        default = False
+    )

     defaultLevels = bpy.props.CollectionProperty(type = BlosmDefaultLevelsEntry)

diff --git a/renderer/__init__.py b/renderer/__init__.py
index c16e12c..ab26de7 100644
--- a/renderer/__init__.py
+++ b/renderer/__init__.py
@@ -114,9 +114,10 @@ class Renderer:
             obj = self.obj
             # finalize BMesh
             setBmesh(obj, self.bm)
+            # Add Default UV Map
+            bpy.ops.mesh.uv_texture_add({"object": obj})
             # assign OSM tags to the blender object
             assignTags(obj, element.tags)
-            layer.finalizeBlenderObject(obj)

     @classmethod
     def end(self, app):
--
2.15.1.windows.2
Verify
Once you have done all the following make sure that it is working by opening up blender (make sure you close after making any code changes). Open up the side panel by pressing n on the keyboard (it should pop up on the right on Blender 2.8)
And open the osm tab. You should also see some options at the bottom about projection systems.

Building our first city
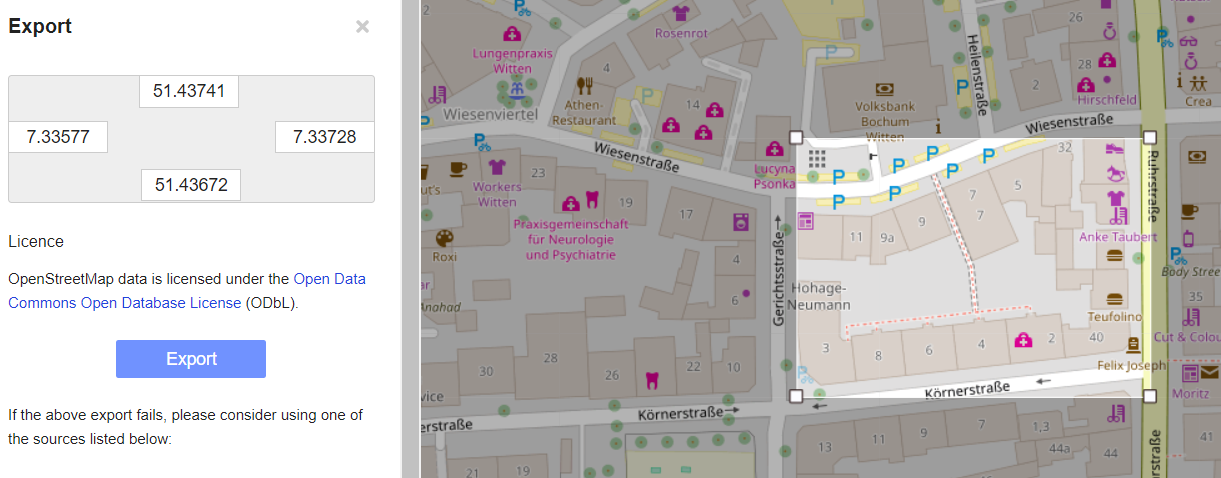
All examples here will be for building a small city block from Witten, Germany. Download this file which hold OSM data we will be importing into Blender.
Save File and Setup
- Save your blender file. You don’t want to lose it!
- Delete everything from your scene, including light, cube and camera.
- Add custom
lat(51.43672) andlon(7.33577) properties to your scene. Also change units to centimeters.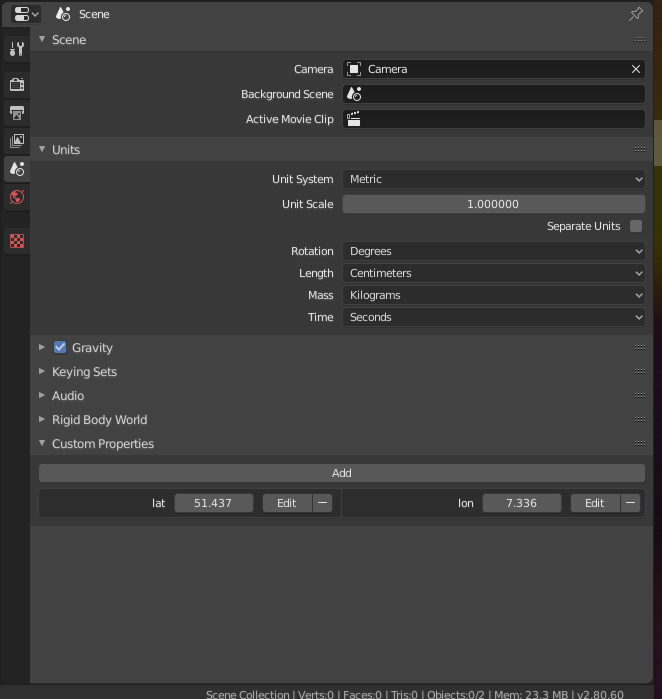
Setting this lat and lon custom property sets the ORIGIN of our projected coordinate system.
This might be a good time to create a folder to save our exported assets and textures to.
Import Terrain
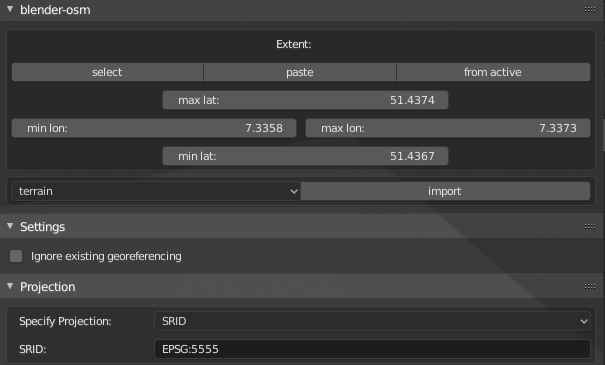
- Open up the
blender-osmpanel and input the coordinates from the bounding box above. - Input
EPSG:5555into Projection -> SRID - Change the dropdown to
terrainand then click import
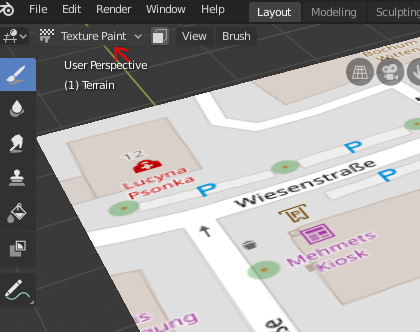
Import terrain overlay (optional)
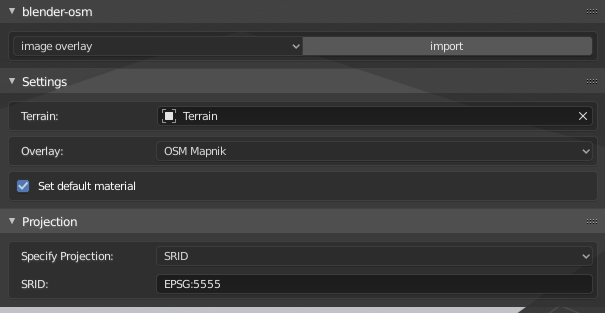
- Change the dropdown to
image-overlay - In settings change
overlaytoOSM Mapnik. Click Import
If you change your view to Texture Paint you should see something similar to this. After verifying change back to object mode.
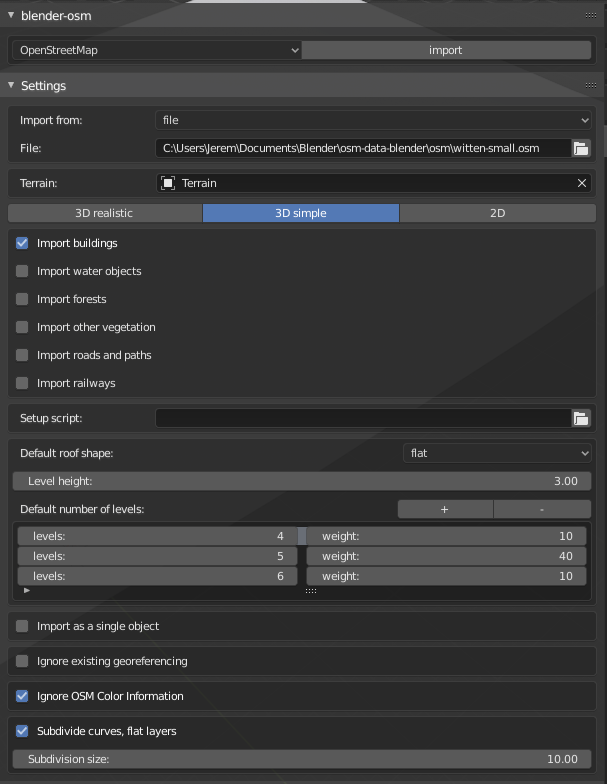
Import Buildings
- Change the import dropdown of
blender-osmtoOpen Street Maps. - Change
import fromtofile. Point it to the OSM file you downloaded. - Make sure only
3DSimpleis selected and that onlybuildingsare checked - Uncheck
import as a single object, checkIgnore OSM Color Information - Click Import
Save Image Overlay
Unfortunately you can not export the image overlay texture into unreal engine. We will have to download the texture manually and recreate this material in Unreal.
- Go to
Texture Painttab - Select the Terrain Image overlay object from the
scene view. This should bring up a window like this: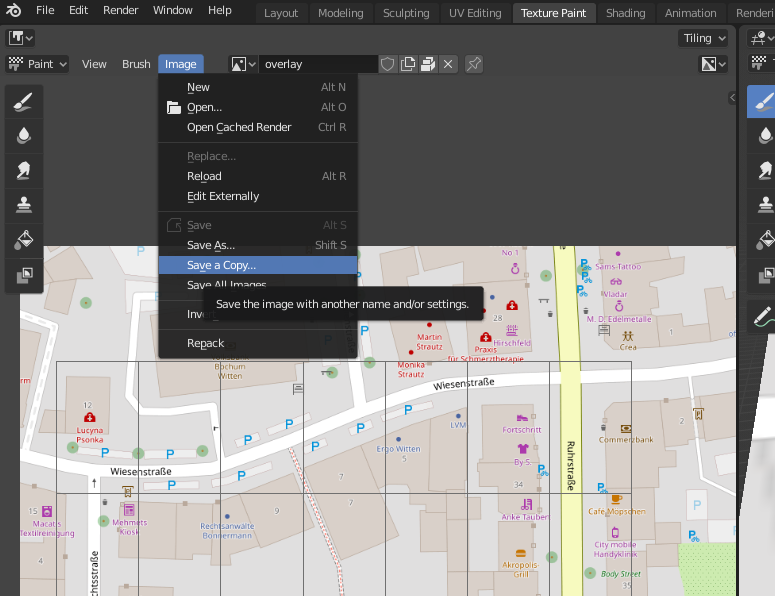
- Click Image -> Save a copy
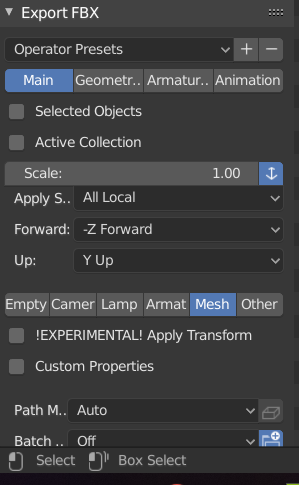
Export as FBX File
- Click File -> Export -> FBX
- Make sure only mesh is selected
Summary
We have used the blender-osm plugin along with bpyproj plugin to import OSM data into Blender that is georeferenced. We have exported the image overlay texture as an image and exported all the meshes into the FBX format. We will later discuss how to import these into unreal in Part 2.
The final blender project file can be downloaded here.